Apillon recipe #2: A Web3 alternative to YouTube
In the second episode of Web3 recipes, you will learn how to create a Web3 Storage for video files, connect it with client-side UIs, and…

In the second episode of Web3 recipes, you will learn how to create a Web3 Storage for video files, connect it with client-side UIs, and host the platform on a decentralized network.
- Why a Web3 alternative to YouTube?
- Web3 Storage and Hosting for videos
- Step 1: Create a Web3 Storage bucket
- Step 2: Build a client-side video upload UI
- Step 3: Host on Web3
- Step 4: Connect your domain
- Step 5: Connect UI to Storage buckets
- Step 6: Enhance UI, upgrade features, launch
Why a Web3 alternative to YouTube?
Indeed, why? Why compete with a behemoth the size of YouTube? Well, you don’t need to compete per se. You can just tap into a decentralized way of redefining the infinite rabbit hole (and goldmine) that is the video content industry.
- By storing uploaded videos in Web3 storage, you ensure they remain accessible even if something happens to your platform.
- Thanks to decentralized hosting, the video site does not depend on centralized hosting providers and mitigates the risks of single-point attacks or censorship.
- By integrating other Web3 services, such as DIDs or NFTs, you could give users more power over their accounts and video ownership.
Web3 Storage and Hosting for videos
With the Apillon platform, you can easily upgrade your video platform to the Web3 level, using primarily the Web3 Storage and Web3 Hosting services.
Both represent condensed and purposed technology of Crust Network, a Polkadot parachain, which pins the linked files to IPFS nodes worldwide.
The whole process can be done by utilizing the Apillon dashboard Web3 services and API keys.
🔎 Learn more about Apillon’s Web3 Storage and Hosting services. 👇

Ready to start building? Let’s go.
Step 1: Create a Web3 Storage bucket
Log into the Apillon dashboard, and in the menu on the left, navigate to Storage. Create a new storage bucket by clicking the yellow button.
🔎 Learn more about Storage bucket.
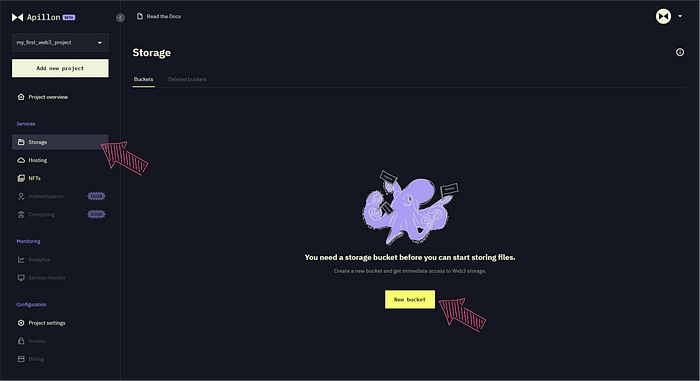
In the pop-up, enter your bucket name to easily distinguish it from other-purpose decentralized storage buckets. Add a description, too, and click “Create bucket & continue to management”.

🔎 Note: With Apillon, you can store up to 5 GB of files on a decentralized network for free — much more than with other decentralized storage providers. In future versions, the platform will allow you to upload and store even more, up to 100 GB of files, on IPFS.
Step 2: Build a client-side video upload UI
For your Web3 video platform to serve the intended purpose, let your audience upload videos to the decentralized storage.
For that, you need the following:
- A custom front-end website written in JavaScript, ReactJS, Vue, Angular, or any other client-side framework able to produce static websites
- A wallet-connect functionality for users to own and manipulate the uploaded video files
- Business logic to upload videos to the Apillon Web3 Storage buckets and build relations towards wallets connected to the page
- A client-side video-upload UI (i.e., a website) hosted on Apillon Web3 Hosting
- A custom domain, connected via the Apillon Web3 Hosting service
For the website template, you may use pre-made Apillon templates, such as the NFT website templates available on the Apillon GitHub.
Now, even though these templates serve the purpose of displaying NFT collections, they’re based on the JavaScript, ReactJS, and VueJS frameworks and a component that allows users to connect their wallets, which can be easily replicated for your video platform.
Simply clone the chosen GitHub repository, remove unnecessary parts for displaying NFTs, and instead, build the front-end and business logic that allows users to drag and drop videos into the website and send the files to Apillon Web3 Storage.
Learn more. 👇

Step 3: Host on Web3
To host your website, you need a scalable service that supports the growth of your Web3 video platform. With Apillon, you can host it on IPFS via Crust Network.
In the Apillon dashboard, navigate to Hosting and click “Add first website”.

Enter your website’s name and description and hit “Create website”.

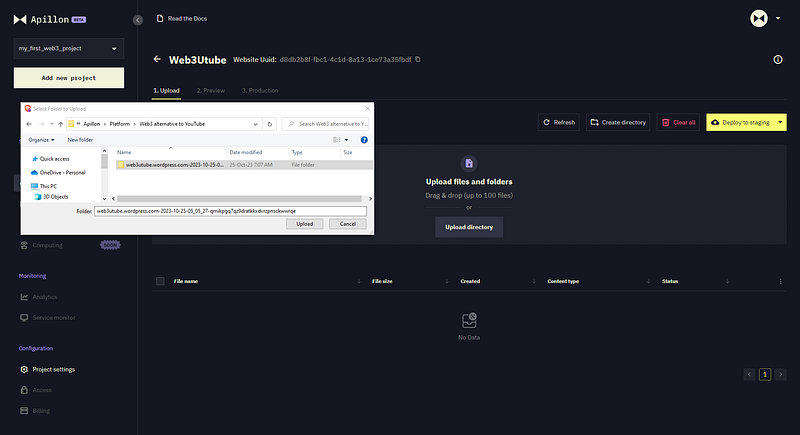
In the next step, you’ll be asked to upload website contents to host them in a decentralized manner.

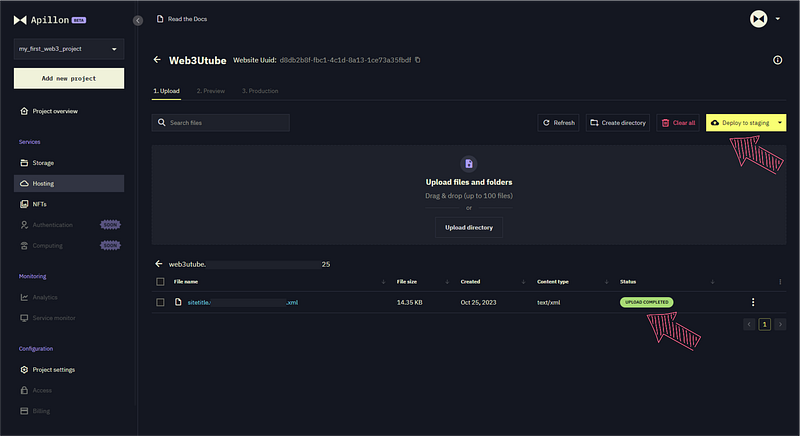
Now, upload the website contents to the Apillon dashboard and move them to Web3 Hosting. Click “Upload directory” or drag and drop separate files. Select the website files from your local drive and click “Upload”.
Once your files are uploaded and appear on the Apillon dashboard, click the folder name to view more details, such as file size and status. Next, click “Deploy to staging” in the top right corner before moving it to the production phase.
This could take up to 5 min to complete.
Once deployed, you can see the files’ IPNS link, indicating that the contents were deployed to a decentralized network and remain mutable — this is crucial for projects like websites, which require frequent updates of their contents and features.
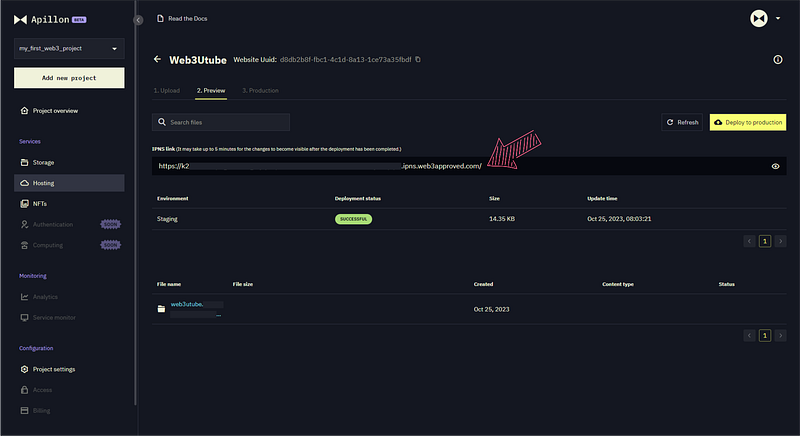
If you click on the IPNS file, you’re taken to an IPFS-based address that holds your website files under it.

Go back to the Apillon dashboard and deploy the contents to production by clicking the yellow button in the top right corner.

Once the deployment is successful, it’s time to link your website’s domain.
Step 4: Connect your domain
Under Domain preview, click “Add domain” if you don’t have one yet or “Configure domain” if you already have one to use and configure for Apillon hosting.

In either case, you’ll need to log into your DNS server or domain registrar and add or edit the DNS records that come with your domain.

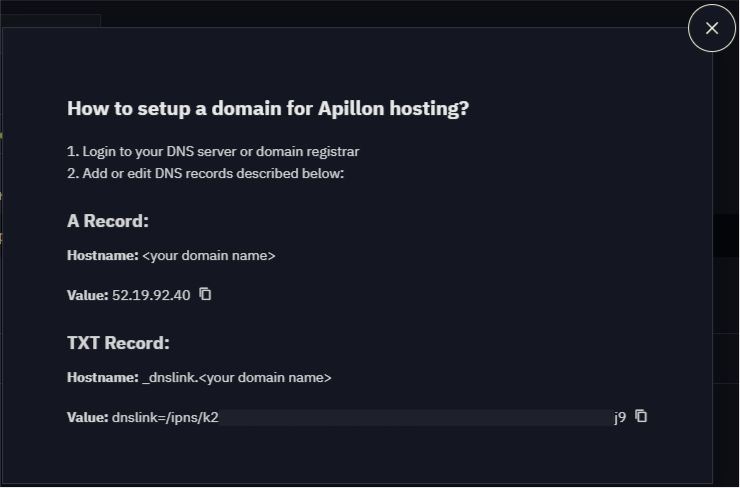
Update the above details with your domain provider to migrate from centralized to Web3 hosting with Apillon, backed by Crust’s pinning on IPFS.
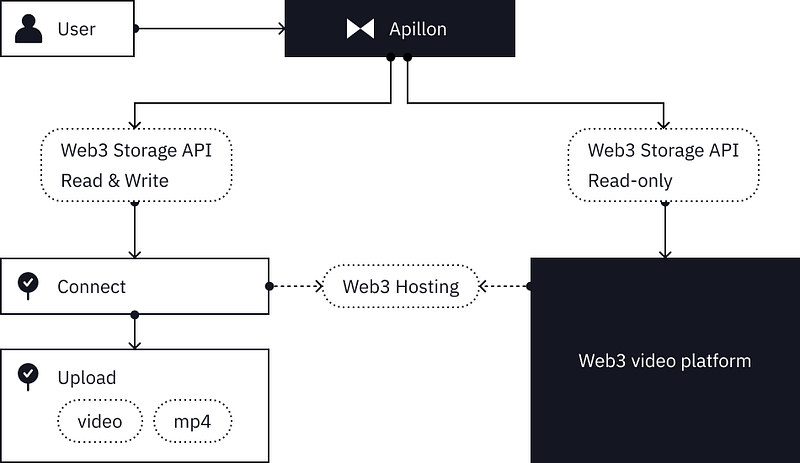
Step 5: Connect UI to Storage buckets
For the purpose of this guide, let’s go with a simple architectural scheme — create two separate Web3 Storage API keys to unlock different user rights:
- 5.1 Video upload UI: API key with Read and Write permissions
- 5.2 Video player UI: API key with Read-only permissions
🔎 Note: Another option to achieve the same outcome is to integrate Phala’s Phat contract that contains business logic handling user rights. With more services to become available on the Apillon dashboard, more ways will lead to similar results.
5.1 Connect video upload UI to Web3 Storage
The first Web3 Storage API key should have both Read and Write permissions. Hooking the key to your Web3 video platform front-end will allow users to connect, upload, and watch videos.
To generate the first API key to connect your client-side UI to Apillon Web3 Storage buckets, go to the Apillon dashboard menu, navigate down to Project settings, and under the API keys tab, click “Generate new key”.

Enter the API Key name, and enable the creation of the API key for Storage service — make sure both Read and Write permissions are checked. Click “Generate”.

Once the API key details show up in a pop-up window, make sure to save the API key’s secret — it’s an essential part of unlocking your API key.

Once the first API key for your Web3 video project UI is ready, click on the three dots on the right, and “Copy API key to clipboard”.

Finally, use the newly generated API key to connect your client-side UI to Apillon Web3 Storage buckets containing uploaded videos.
The next thing you need to do is create another Web3 Storage API key to only display videos on your Web3 video platform. 👇
5.2 Connect video player UI to Web3 Storage
To prevent abuse of your Web3 video platform, create another, separate UI that only allows playing, not uploading videos.
For that part, you need another Web3 Storage API key, but this time, holding only Read permissions.
On the Apillon dashboard, click “Generate new key”.

Enter the name of this API key to distinguish it from the previous one, and make sure only Read permissions are checked. Click “Generate”.

Once the API key details show up, save the API key secret and proceed.

Your read-only API key to Web3 Storage is now ready, and you can use it in a separate front end to display videos on your platform.

Step 6: Enhance UI, upgrade features, launch
The last thing on your to-do list is to play around with options for your UI. Allow your fans to watch videos and upload them to contribute to your platform’s growth, add user-friendly features, and top it off with a nice design.
And to spice it up with some more Web3 flavor, consider adding other decentralized services in its future versions:
- Integrate Apillon’s Web3 Authentication service to power user registration and log-in.
- Allow users to utilize decentralized identifiers (DIDs) with complete privacy control and full ownership of the videos they upload.
- Integrate the Web3 Computing service to add video resize or other file manipulation logic.
- Integrate the NFT service to issue videos as transferable NFTs.
This is how you can create a decentralized video viewing and sharing platform with Apillon. Of course, you can always add your touch by designing the UI from scratch or tweaking the APIs to your project’s preference — go wild.
Stay tuned for more Web3 service upgrades on the Apillon platform and advance your video business with a full focus on a decentralized approach, user autonomy with DIDs, and digital ownership through NFTs.

Want more?
Keep the momentum going. Explore more posts for sharp insights, real tips, and Web3 stories that might just spark your next big idea:

⧓ About Apillon
The Apillon platform serves as a unified gateway to the Web3 services provided by linked Polkadot parachains. Following the multi-chain vision, Apillon powers the transition of developers to Web3, simplifying its adoption in the real economy, and expanding its versatility as the ecosystem grows. With Apillon, Web3 services are within reach for every developer, regardless of their background and experience with blockchain technology.
Website | Wiki | GitHub | Twitter | Telegram | LinkedIn | Reddit