Apillon Recipe #3 — A Web3 alternative to Google Drive, Dropbox
In the third recipe by Apillon, you will learn how to establish a decentralized platform for storing and sharing files and host it on IPFS.

- Why a Web3 alternative to cloud storage?
- Web3 file storage — in cloud, but decentralized
- Step 1: Create a Web3 Storage bucket on Apillon
- Step 2: Add Web3 Authentication service
- Step 3: Build a UI for file upload and sync
- Step 4: Connect UI to Apillon via API
- Step 5: Host your platform via Apillon
- Optional: Custom upgrades
Why a Web3 alternative to cloud storage?
It goes without saying — Dropbox and Google Drive are the staples of cloud storage. We’ve all used them to share files with our friends and colleagues, thanks to their multi-account access and plenty of features that make file management a child’s play.
In both cases, you get a certain amount of storage space in an online server, depending on your plan.
But, as big-tech products, specific terms apply, and when we submit files to their servers, we also give up some of our authority. Besides, using centralized servers for storing files leaves room — albeit narrow — for single-point hazards.
The Web3 technologies introduce a paradigm that defies reliance on centralized cloud storage platforms. With Apillon, you can create a Web3 file-sharing service that allows you — or your platform’s users — to retain greater control over the files, their ownership, and accessibility.
Web3 file storage — in cloud, but decentralized
The leading Apillon service to power your cloud storage platform is Web3 Storage. It implements the technology of Crust Network, a Polkadot parachain that pins files to IPFS nodes around the globe.
🔎 Learn more about Apillon’s Web3 Storage service. 👇

The user registration and log-in features are delivered by Apillon Web3 Authentication service powered by KILT Protocol, a Polkadot parachain built around decentralized identity and verification.
🔎 Learn more about Apillon’s Web3 Authentication service. 👇
Both services can be accessed simply via API and integrated into the client-side interface of either desktop, mobile, or web apps.
Architecture
The diagram below illustrates the architecture of the Web3 cloud storage project we’re building today. 👇
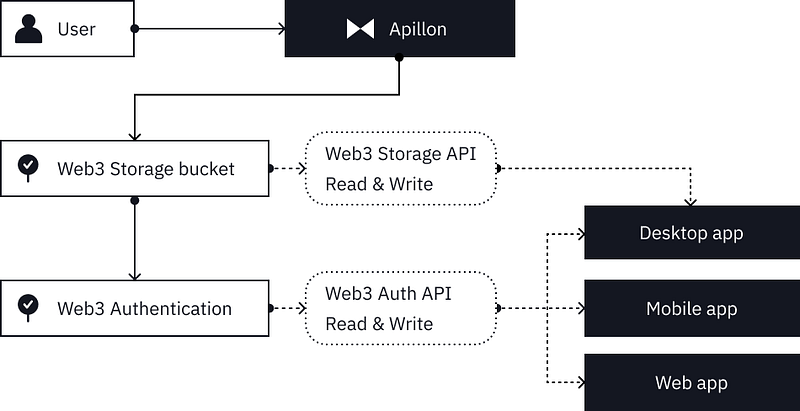
First, you will create a Web3 storage bucket for your project to enable file storage. You will also need the Web3 Authentication service to allow your audience to register an account and log in using their decentralized identities. And finally, using the API key, you will integrate the decentralized features into your project’s user interface.
Back-end logic
While the architecture above does facilitate the intended functionalities of cloud-based file storage, we should add a disclaimer.
☝️ Disclaimer: To achieve a fully decentralized alternative to cloud storage platforms using Apillon, you may want to build a custom back-end logic. To enable specific functionalities, you may need to set up a separate back-end service, either on your own server or in the cloud, to handle the extended authentication functionalities as well as additional logic of your app. Keep in mind that even though that back-end service may be centralized, the end result, i.e., files stored over your Cloud Sync app, will be decentralized.
Ok, let’s start assembling the puzzle.
Step 1: Create a Web3 Storage bucket on Apillon
Register or log in to the Apillon dashboard. In the menu on the left, navigate to Storage and create a new storage bucket by clicking the yellow button.
🔎 Learn more about Storage bucket.
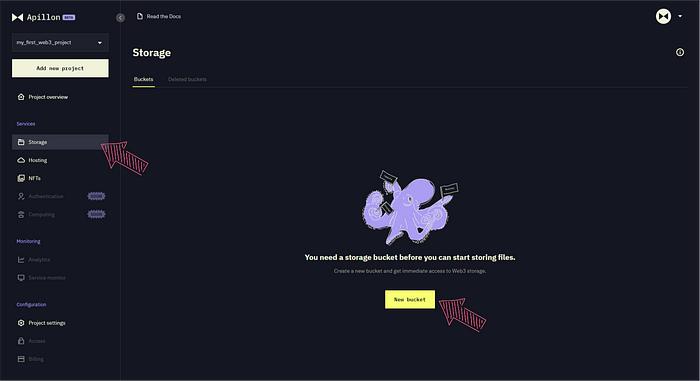
In the pop-up, enter your bucket name to easily distinguish it from other-purpose decentralized storage buckets. Add a description, too, and click “Create bucket & continue to management”.

🔎 Note: With Apillon, you can store up to 5 GB of files on a decentralized network for free — much more than with other decentralized storage providers. In future versions, the platform will allow you to upload and store even more, up to 100 GB of files, on IPFS.
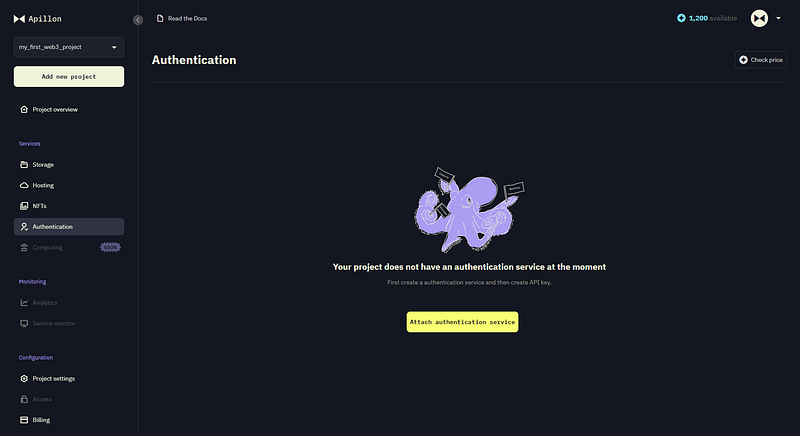
Step 2: Add Web3 Authentication service
The newly released Apillon Web3 Authentication service allows you to implement fully decentralized user account registration and log-in for your project users.
Powered by KILT Protocol, it allows you to deliver secure and self-sovereign digital identity registration to all your privacy-aware users via decentralized identifiers (DIDs) and Sporran wallet.
🔎 Example: See how account registration using KILT’s decentralized identity looks for users.
Click “Attach authentication service”. From there, you will be able to generate an API key.
🔎 Note: Currently, the Apillon Web3 Authentication service delivers solely API connectivity and does not provide a drag-and-drop approach. For more guidance, please refer to the Apillon Wiki or Apillon Discord channel.
Dealing with API keys will be described in one of the following steps.
Step 3: Build a UI for file upload and sync
For your project to work similarly to prevalent cloud storage platforms, it should allow users to upload and sync files automatically.
Whether the platform serves as a desktop, mobile or web app, its client side should be able to connect via Apillon API to support this feature.
For your project’s client side, you need the following:
- A custom user interface written in JavaScript, ReactJS, Vue, Angular, or any other client-side framework able to produce static platforms
- A wallet-connect functionality allowing users to register an account, own and share the uploaded files
- Business logic to upload files to the Apillon Web3 Storage buckets and build relations towards wallet accounts connected to the platform
- A custom domain, connected via the Apillon Web3 Hosting service
If you don’t have a website design yet, you may use pre-made Apillon templates, such as the NFT website templates available on the Apillon GitHub.
While these website templates were designed to display NFT collections, their JavaScript, ReactJS, and VueJS frameworks with a wallet-connect component work just as well for your Web3 cloud storage platform.

Simply clone the GitHub repository of the chosen template and remove the unnecessary parts made for displaying NFTs. Build the front-end and business logic that allows users to drag and drop files onto the platform and send them to Apillon Web3 Storage.
Add also sync logic so that the users always have access to the latest version of their files, regardless of where and when they log in.
🔎 Note: Another option to achieve the same outcome is to integrate Phala’s Phat contract that contains business logic handling user rights. With more services soon to become available on the Apillon dashboard, more ways will lead to similar results.
⚠️ Important: Keep in mind that all files sent to Apillon Web3 Storage are directly pinned to IPFS nodes over Crust Network. That means there is no file encryption in the process, so the files become available in a readable form on the wider IPFS network. To enable privacy for sensitive files, it is crucial to implement file encryption in the process of file syncing.
Step 4: Connect UI to Apillon via API
To use API connectivity to Web3 services provided by Apillon and integrate decentralized features to your cloud storage platform, you need an API key.
With Apillon, you can create a single API key that unlocks multiple Web3 services. In this case, you need the Web3 Storage and the Web3 Authentication services.
- First, the Web3 Storage API key will allow users to upload and store files on IPFS via Crust Network.
- And second, the Web3 Authentication API key will let you integrate the Apillon OAuth protocol into your platform and offer KILT-based decentralized identity registration and log-in to its users.
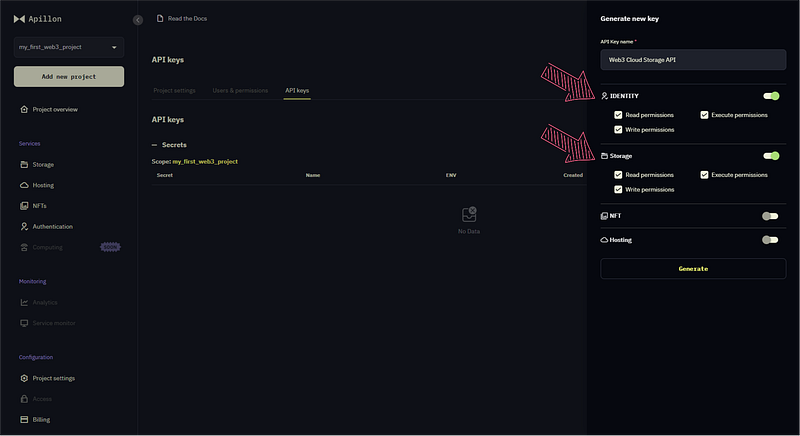
Go to the Apillon dashboard menu, navigate down to Project settings, and under the API keys tab, click “Generate new key”.

In the pop-up window on the right, under Generate new key, name your API key and toggle the services that need API connectivity, namely Authentication and Storage.
Make sure all permissions are checked — Read, Write, and Execute.
Once the API key details pop-up appears, save the API key and its secret. You will need it to connect your platform’s client side with Apillon-provided Web3 services.
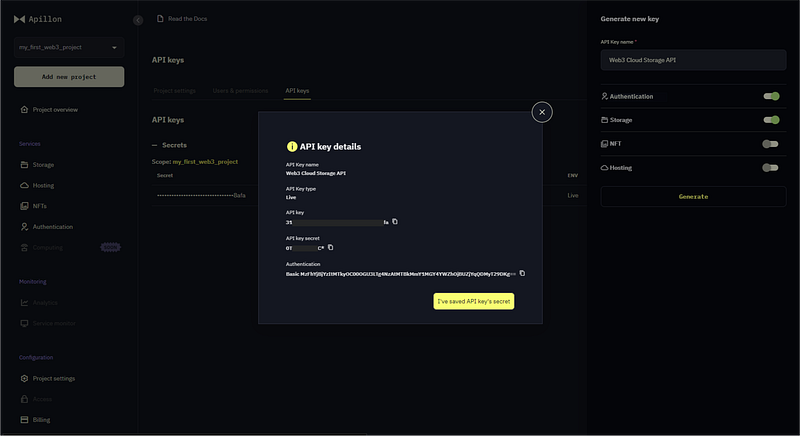
You can also click on the three dots on the right of the API key and click Copy API key to clipboard.

That’s it. You just acquired the key to unlocking Web3 functionalities on your cloud storage platform. Use it in your client-side UI and connect to Apillon-supported Polkadot parachain services.
File storing, owning, and sharing can now be done on a decentralized level and offer greater privacy to its users.
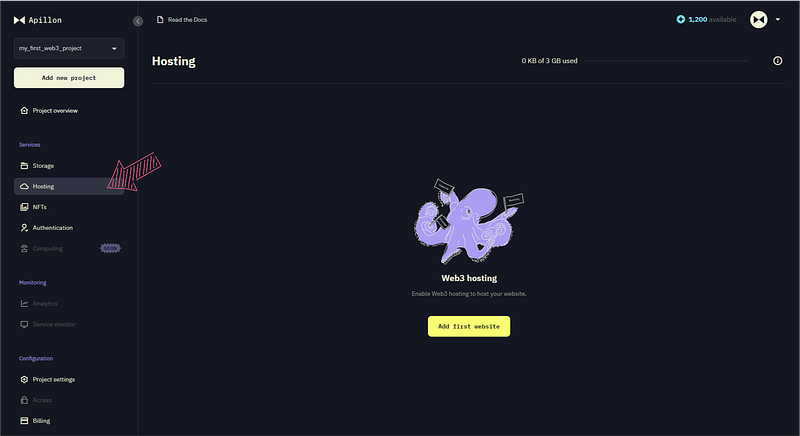
Step 5: Host your platform via Apillon
Finally, ensure your cloud storage platform stays up and active as long as you want it to, without relying on a centralized hosting provider.
Host it on a decentralized network by pinning its contents to IPFS via Crust. On the Apillon dashboard, navigate to Hosting and click “Add first website”.
In the pop-up window, enter the website name — for your reference only on the Apillon platform — and click Create website.
Under the 1. Upload tab, upload website files from your local drive, and click “Deploy to staging” to test the outcome before moving it to production.

After the successful deployment to staging, check the details under the 2. Preview tab, including the newly created IPNS link of your website files. If everything works fine, seal the deal by clicking “Deploy to production”.

Your Web3 cloud storage platform is now hosted decentrally and pinned to IPFS via Crust Network. As long as you have the IPFS link (or IPNS link to ensure editability), you can access your platform and keep it up and running thanks to a network of dozens of individual nodes around the globe.
Optional: Custom upgrades
Now, if all this was too easy, feel free to turn your cloud storage platform up a notch. Add more Web3 services courtesy of the Apillon platform and deliver a greater user experience with privacy and security in mind.
For example, you could integrate the Web3 Computing service (coming soon) to add file editing or manipulation logic. Or, incorporate the NFT service to encrypt files as transferable NFTs.
Web3 is your oyster. Make the most of it with Apillon.

Want more?
Keep the momentum going. Explore more posts for sharp insights, real tips, and Web3 stories that might just spark your next big idea:

⧓ About Apillon
The Apillon platform serves as a unified gateway to the Web3 services provided by linked Polkadot parachains. Following the multi-chain vision, Apillon powers the transition of developers to Web3, simplifying its adoption in the real economy, and expanding its versatility as the ecosystem grows. With Apillon, Web3 services are within reach for every developer, regardless of their background and experience with blockchain technology.
Website | Wiki | GitHub | Twitter | Telegram | LinkedIn | Reddit