Apillon Recipe #4 — NFT metadata storage
In round four of cooking Web3 with Apillon, you will find why the storage of NFT metadata matters and how to bring it to a decentralized…
In round four of cooking Web3 with Apillon, you will find why the storage of NFT metadata matters and how to bring it to a decentralized network in a few steps.
- Why decentralized storage for NFT metadata?
- Decentralized storage by Apillon
- Step 1: Create a Web3 Storage bucket
- Step 2: Upload NFT metadata and media files
- Step 3: Deploy NFT smart contract
Why decentralized storage for NFT metadata?
Short answer? Because you could be sorry otherwise.
The most common NFT types include some sort of media files, which cannot be stored on the blockchain due to their size. Such NFTs still depend on online storage to display images, videos, and other media files that make them memorable.
The crucial part here is how that online storage works. A centralized server could be shut down or have restricted access. The link to the asset could thus be broken or produce an error, leaving the contents that make up the asset — and render it non-fungible — useless, lost, or inaccessible.
That’s why storing the elements of an NFT in a decentralized manner, bypassing single points of attack, is crucial for their longevity, relevance and value. That goes particularly for NFT metadata, which holds an asset’s exact description on-chain that makes it unique and can’t be replicated — unlike the media file that could be copied and reused ad nauseam, parting from its non-fungible identity.
🔎 Learn more. 👇

Decentralized storage by Apillon
With Apillon, you can bring your NFT collection to a fully decentralized level, metadata storage included.
Apillon’s Web3 Storage service allows you to upload your NFT files to a decentralized storage bucket in a few clicks. The service is powered by Crust Network, a Polkadot parachain that serves IPFS connectivity and pins files to a global decentralized network of nodes.
🔎 Learn more. 👇

☝️ Note: You could also go the coding route and use Apillon’s Web3 Storage API. Learn more 👉 here.
Ok, let’s get started.
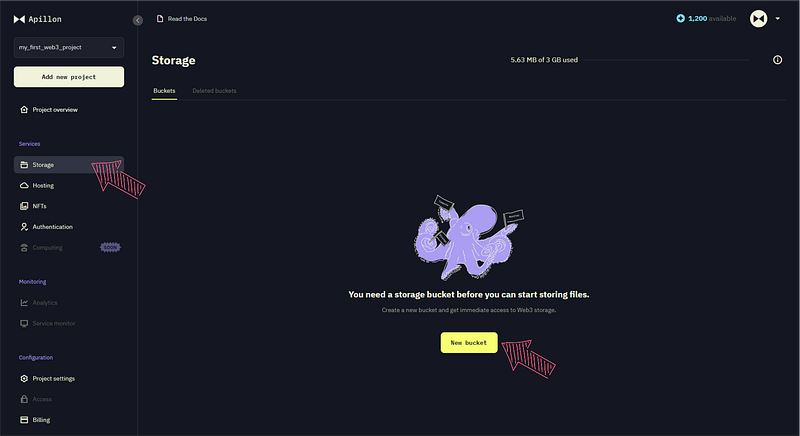
Step 1: Create a Web3 Storage bucket
In the menu on the left, under Services, navigate to the Storage section to create a Web3 Storage bucket.
Click the New bucket button at the bottom of the page (if this is your first time using buckets) or in the top right corner (if you’re adding it to previously created buckets).
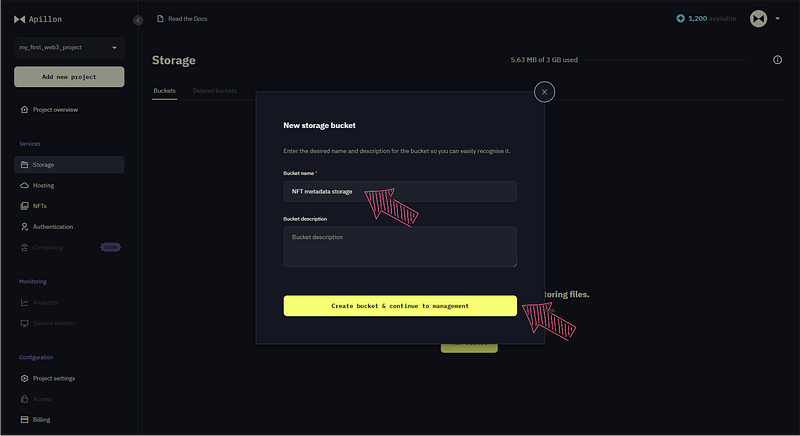
Then, name the new storage bucket to distinguish it from other-purpose storage buckets easily, add a description if you wish, and click Create bucket & continue to management.
Step 2: Upload NFT metadata and media files
To bring your NFT metadata to your Web3 Storage bucket, simply use the drag and drop function or click on the Upload files and folders field to select them from your local drive.

☝️ Note: At this step, you can upload both the NFT metadata file as well as the media files that represent the visual part of the NFT.
⚠️ Important: The NFT metadata file should be in the CSV format. The media files can be in any format.
In the low right corner, review the list of selected files, check the Wrap to directory option if you wish so, and click “Upload now”.

If you choose to wrap files in a directory, name the newly created folder to easily distinguish it from others and click “Upload”.

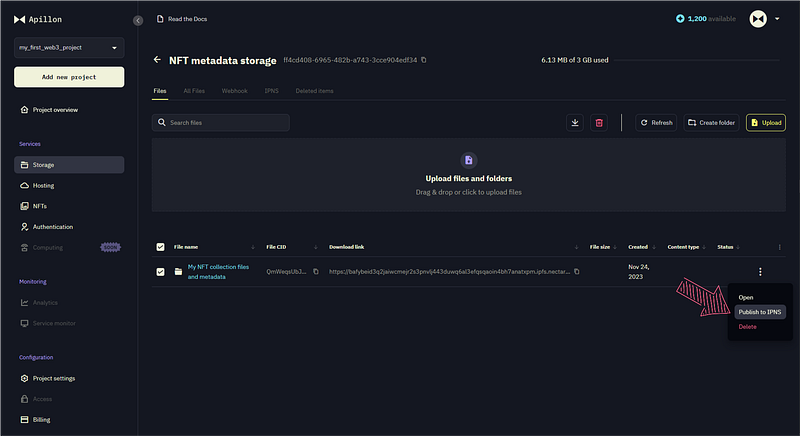
Once all files are successfully uploaded, they appear listed in your Web3 Storage bucket.
When you click on the folder name, a detailed list of files appears with detailed info, including File CID, Download link, File size, and Status — it should say Uploaded to IPFS.
If you wish to keep the files editable — particularly the NFT metadata file — so that you can update contents if needed, publish them to IPNS.
🔎️ Note: File editability comes in handy when an NFT’s attributes or parameters are updated with time or use. For example, in-game NFTs, such as tools and skins, could upgrade their status, rank, or utility through the course of the game and need to show it to the user in its latest version. Or, brands could launch limited-edition NFTs that unlock exclusive features for customers as they make a purchase. In such cases, it is advisable to add the mutability feature with IPNS and avoid the headache of having to upload new metadata each time an NFT’s attribute changes.
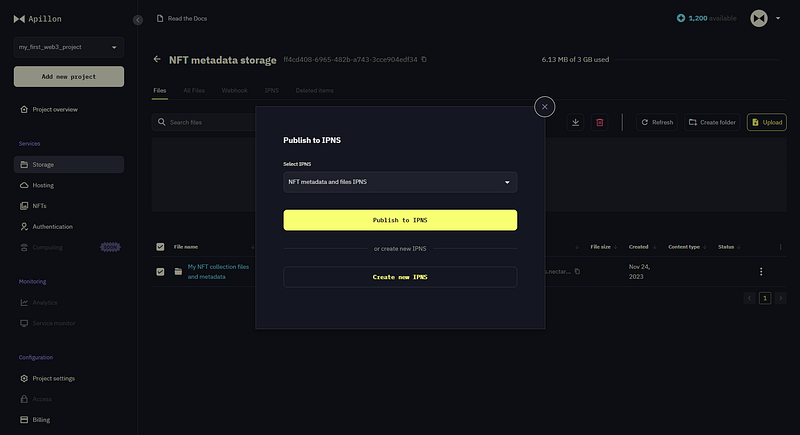
Go back to the Web3 Storage bucket where your recently uploaded files or folder are listed. Under the three dots on the right, click Publish to IPNS.
In the pop-up window, choose the IPNS record you’d like to upload to and click “Publish to IPNS” or create a new IPNS record.
In moments, your NFT files are uploaded to IPNS — you can find more details, including the IPNS name and link, under the IPNS tab. If the site doesn’t update soon, click “Refresh”.

Click on the IPNS link to see all the linked files uploaded to IPNS.
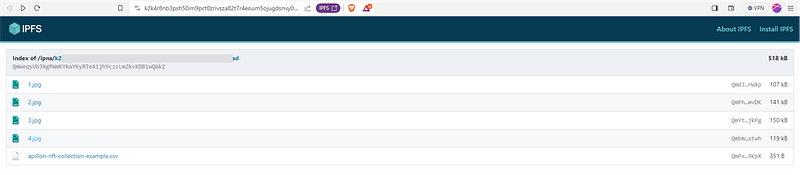
Now your NFT metadata and all the uploaded media files live decentrally on IPFS, unstoppable from third-party impact, and accessible as long as you or other users have a link to them.
Step 3: Deploy NFT smart contract
Now, to bring your NFTs with decentrally stored metadata to life, navigate to the NFT section in the Services menu on the left.
Click New NFT collection.

To deploy your NFT smart contract, you can go with either Moonbeam Network or Astar.
Follow the guides below based on your choice and launch your NFT collection in an end-to-end decentralized fashion using a click-through approach.


Or, go down the coding path and create and manage your NFT collection using the Apillon NFTs API.
Affordable, accessible, decentralized
This is how you can bring your NFT collection to a fully decentralized level, on-chain metadata included.
While Apillon’s Web3 Storage and NFT services are not the only option you have on the market, they certainly deliver an unbeatable value for the price and effort invested.
There are no more excuses when it comes to serving end-to-end decentralized NFTs and ensuring their longevity in the Web3 space. Upgrade or launch your NFT collection with Apillon today.

Want more?
Keep the momentum going. Explore more posts for sharp insights, real tips, and Web3 stories that might just spark your next big idea:


⧓ About Apillon
The Apillon platform serves as a unified gateway to the Web3 services provided by linked Polkadot parachains. Following the multi-chain vision, Apillon powers the transition of developers to Web3, simplifying its adoption in the real economy, and expanding its versatility as the ecosystem grows. With Apillon, Web3 services are within reach for every developer, regardless of their background and experience with blockchain technology.
Website | Wiki | GitHub | Twitter | Telegram | LinkedIn | Reddit