Asset Hub and Apillon: Effortless asset creation in the Polkadot ecosystem
Learn how Asset Hub simplifies asset creation in the Polkadot ecosystem and how Apillon makes it even easier with a no-code UI.
· What is Asset Hub?
· Apillon: your no-code gateway to Asset Hub
· How to deploy and manage assets with Apillon
· Your very own guide to asset creation
· Managing your asset post-creation
· Why choose Apillon for asset creation?
Before we dive into the details, here’s the bottom line: if you want to create, manage, and transfer assets in Polkadot, Asset Hub is the way to do it. No complex development, no unnecessary friction — just a reliable system for launching and using tokens efficiently.
What is Asset Hub?
Asset Hub is Polkadot’s dedicated chain for creating, managing, and using digital assets. It’s the go-to place for launching tokens, setting up NFTs, and ensuring they work seamlessly across multiple parachains.
Here’s what Asset Hub enables you to do:
- Create assets: Easily issue custom tokens or NFTs for your project or community.
- Send and receive assets: Transfer them like cryptocurrency — fast and secure.
- Manage assets: Control supply, set permissions, and decide how they’re used.
- Use assets across chains: Tap into Polkadot’s interoperability to interact with different blockchains.
- Customize assets: Enable special features like freezing (temporary lock) or burning (permanent removal).
In short, Asset Hub is the backbone of asset management in Polkadot — flexible, powerful, but also quite technical. And Apillon makes it effortless.
📌 Want the full technical deep dive? Check out the official Asset Hub documentation.
Apillon: your no-code gateway to Asset Hub
Creating assets on Asset Hub used to be a complex process — navigating Substrate’s asset pallet, dealing with governance rules, and manually executing transactions through the Polkadot.js UI. Not exactly beginner-friendly.
With a simple UI, Apillon removes the complexity and lets you create and manage assets effortlessly — no coding required.
Whether you’re launching a community token, an NFT series, or a fully-fledged asset-backed project, Apillon’s integration with Asset Hub makes asset creation easier than ever.
How to deploy and manage assets with Apillon
Ready to launch your own token? Here’s how Apillon simplifies the process:
- Create a free Apillon account at apillon.io and log into the dashboard.
- Start a new project — this gets you 1,200 free credits to experiment with.
- Navigate to the Asset Hub service in the dashboard.
- Connect your wallet — this is crucial, as your wallet will sign all transactions, ensuring ownership and security.
Behind-the-scenes explanation:
➡️ Connecting your wallet is essential — it ensures that the asset you create remains entirely under your ownership and control.
➡️ Apillon acts as a gateway to Asset Hub, but every action — creating, managing, or modifying an asset — is signed and executed through your wallet.
➡️ At no point does Apillon have control over your asset. You retain full authority from creation to management.
Your very own guide to asset creation
Let’s start with some visual representation so it will be easier to follow.
After the 4 steps mentioned above you followed, you should now land here 👇

Before creating your asset, take a moment to explore existing ones on Asset Hub. It’s a quick way to spark new ideas or double-check if your desired ticker and ID are still available — so you don’t run into surprises later.
Once you’re ready to move forward, click “Create new asset” to kick off the setup process. Next, we’ll fine-tune the details to get your asset just right.
Next, to create your asset, fill out the form with all the required details — this ensures it’s fully functional and ready to go. If you’re unsure about any field, use the helper tooltips or the explanations on the right side of the form.

Key fields to fill out:
- Network:
Choose between testnet (Westend) for testing or mainnet for live deployment. We recommend testing on Westend first to avoid unnecessary clutter on Mainnet.
2. Characteristics:
- Asset name — Enter a name for your asset.
- Asset symbol — This must be unique. Apillon automatically checks availability, so you’ll know right away if it’s already taken.
- Initial supply — Define the total number of tokens.
- Minimum balance — The smallest amount an account must hold to stay active. If the balance falls below this, the remaining amount is considered dust and gets removed.
3. Issuer address & Freezer address:
These should match the wallet you connected in the first step. This ensures that your wallet holds control over asset issuance and freezing functions. Double-check these addresses before proceeding to avoid access issues later!
☝️ Note:
Creating on Westend? You can receive free testnet tokens on the following Faucet: https://faucet.polkadot.io/westend
Deploying on Mainnet? If your asset is meant for production use, consider setting up a multisig wallet through Substrate. This enhances long-term security and controlled access, reducing risks tied to a single point of failure.
Finalize your asset creation
- Review your setup — Make sure all details are correct. Once you’re satisfied with the configuration, click “Create Asset” to proceed.
- Sign the transaction — Your wallet will prompt you to approve the creation. This signature ensures the asset is deployed under your control.
- Transaction fee — You’ll need a small amount of DOT to cover the blockchain transaction fee.
Once signed and confirmed, your asset is officially live on the blockchain! You can view the transaction details in the link.

🚀 And that’s it! Your asset is now live on Asset Hub and ready for use.
After closing the pop-up, you’ll be redirected to the main asset list. Above it, you’ll see a dedicated section for your newly created assets.
Clicking on it will open its details, where you’ll find all available actions on the right side. And just like that, your asset is now live and ready to be managed.
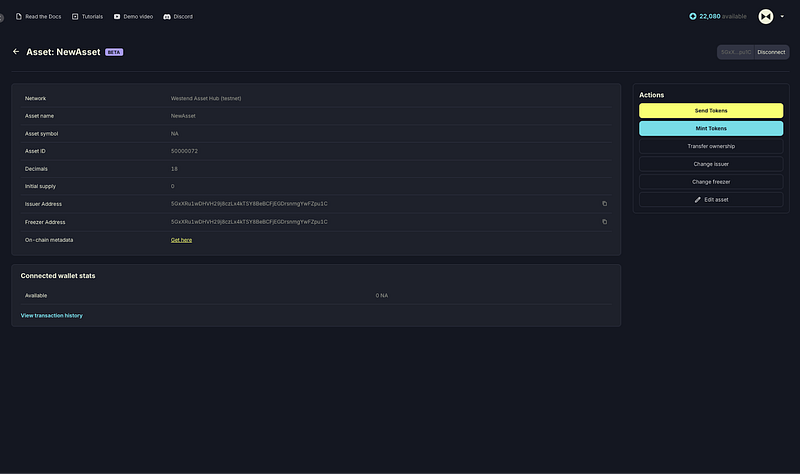
Managing your asset post-creation
Once your asset is live, Apillon provides an intuitive interface for tracking, transferring, and modifying your tokens. Some key management features include:
- Freezing assets to prevent transactions.
- Burning tokens to reduce supply.
- Enabling cross-chain transfers within the Polkadot network.
- Integrating with dapps using approve_transfer functions for automated transactions.
Why choose Apillon for asset creation?
The traditional way of creating assets on Asset Hub requires technical expertise and manual execution through the Polkadot-JS UI. Apillon simplifies the process with an intuitive, no-code solution that lets anyone deploy, manage, and scale assets with ease.

⧓ About Apillon
The Apillon platform serves as a unified gateway to the Web3 services provided by linked Polkadot parachains. Following the multi-chain vision, Apillon powers the transition of developers to Web3, simplifying its adoption in the real economy, and expanding its versatility as the ecosystem grows. With Apillon, Web3 services are within reach for every developer, regardless of their background and experience with blockchain technology.