Web3 Authentication — Why and how to add it to your Web3 project?
With Apillon, the KILT-powered decentralized identity and authentication feature can be easily integrated into your website or dapp.

Web3 Authentication
For various reasons, a large share of websites, apps and online platforms require user authentication.
While until recently, the only way to do that was via Web2, centralized options, the new generation of the Internet offers a better way — using decentralized authentication protocols. These protocols ensure greater data security and grant users sovereignty over their credentials.
With Apillon, this option has become widely accessible to everyone who knows how to make their site communicate via APIs.
Powered by KILT Protocol
With Apillon, you can integrate a decentralized authentication feature to your website or app, using a decentralized identifier (DID) stored on the KILT parachain.
KILT-powered decentralized user identity is verified through user-provided credentials attested by Apillon or SocialKYC.
Any user of your website or app can generate their own decentralized identity, verify their email address through Apillon’s OAuth protocol, and use the identity to access your site while being fully in charge of their credentials.
Apillon’s OAuth protocol
The OAuth protocol allows you to integrate OAuth authentication simply and fast via the Apillon API.
There are two steps to this process:
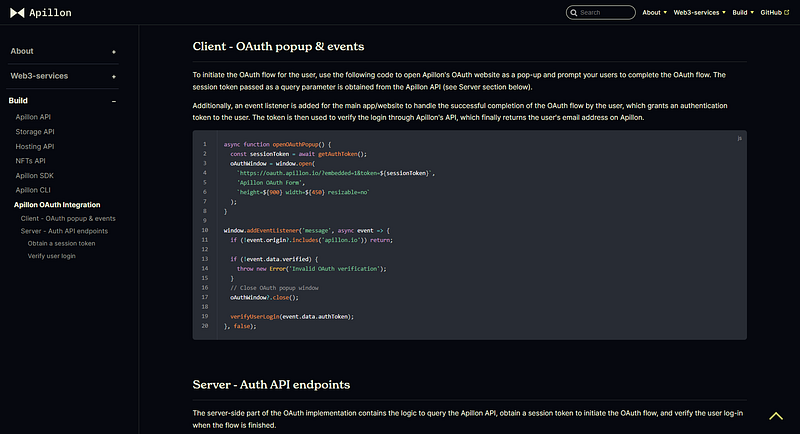
1. The client-side JavaScript code opens an OAuth window for users to authenticate. The code can be found here and contains the following key functions:
getAuthToken()to retrieve a session token from the server, which establishes a session with the Apillon OAuth protocol on https://oauth.apillon.ioopenOAuthPopup()for users to complete the OAuth log-in flow through a pop-up windowverifyUserLogin(oAuthToken)to verify a user’s login credentials using the OAuth token provided from the session after the successful OAuth flow completion
2. The server-side code generates an OAuth session and attests a user’s credentials. It’s located here and sets up an Express.js server via two routes:
/session-tokento retrieve a session token, which is then sent back to clientverify-loginto verify a user’s login credentials and return the user’s email back to the client, which concludes the OAuth flow and allows the use of email in account creation, its association with the email address and OAuth login type, and other purposes.
With everything in place from the server directory, the only thing left to do is to run npm install and npm start to start the server on port 3000.


Apillon’s Web3 Authentication flow
The Web3 Authentication service on the Apillon dashboard represents an easy way to equip your project or website with a decentralized authentication approach using a decentralized identifier (DID).
The service is powered by KILT Protocol and KILT’s Sporran wallet.
Before integrating a KILT-powered decentralized authentication feature into your Web3 project, you should understand the crucial steps involved.
Email Verification
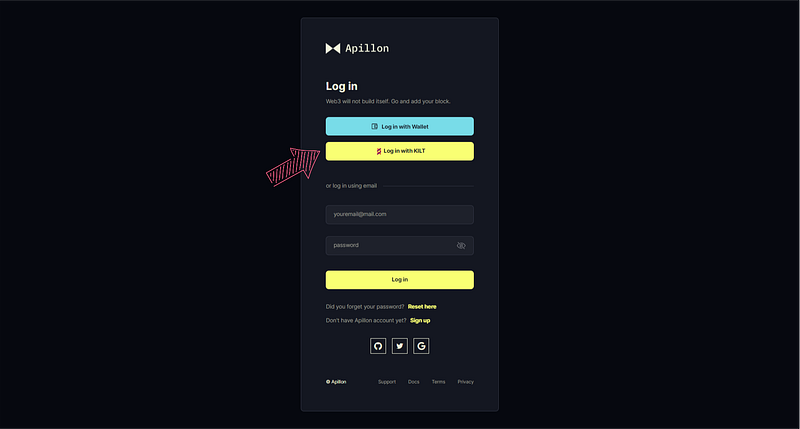
When a user interacts with your website, the Apillon OAuth pop-up window initiates the OAuth process.
To generate a decentralized identity, a user should provide their email, which serves two purposes:
- It initiates the generation of a decentralized identity.
- It serves as a mechanism to attest a user’s ownership of the provided credentials and their linkage to a decentralized identity.
Account Generation
The user also needs a KILT-based Sporran wallet installed and a user account created.
Their account’s address is derived from a BIP39 mnemonic — this serves as the master key granting them access to the account, hence it should be stored securely.
Identity Generation
Next, the user should create a DID — a unique decentralized identifier by KILT — by signing a request in the Sporran wallet.
They should also link their DID with their KILT account so they can later retrieve a DID for it and vice-versa.
☝️ Note: All DID document querying occurs on the front end. As such, Apillon never gains access to either the mnemonic or the DID document.
☝️ Note: The decentralized identity can also be generated via Apillon’s OAuth pop-up window.
Account Attestation
There are two steps to attest an account in a decentralized fashion and by revealing only the user data relevant to your website.
- The user’s identity claim gets verified through a linked email.
- A verifiable credential is created to represent a certain aspect or data belonging to the user, hence it should be stored securely. It is signed by both Apillon and the claimer using the authentication key, and its root hash is submitted to the blockchain.
Once verification is completed, Apillon’s OAuth pop-up informs your website of the OAuth flow completion and provides an authentication token. This token can be used by your site to verify the user’s identity through Apillon’s API.
Now, you can grant user access to your site based on their Apillon account’s email address, which ensures that they have successfully verified their identity using verifiable credentials attested by Apillon.
DID and Verifiable Credential Storage
Once the credential is successfully generated, the user should save the generated files. The credential could also be imported into the Sporran wallet for convenience and safekeeping.
Identity Revocation
Upon request, a user’s DID can also be revoked through Apillon’s OAuth website.
After an email with a unique token is sent to the user, a revocation operation for the user’s DID document is issued to the blockchain, rendering the identity invalid.
This also makes all verifiable credentials associated with the user unusable. However, the wallet account that the user has generated in the registration process remains valid, as well as all tokens associated with that account address.
Credential Restore
In case a user loses access to their credentials, they can also restore them through Apillon’s OAuth website.
After a unique token is sent to the user’s email and clicked, the user regains access to their saved credentials on a secure site.
Credential Verification
Upon next login or access to your website, the user can prove their identity in two ways:
- By using their Sporran wallet to verify their previously imported credentials in just one click.
- By providing a credential generated through Apillon OAuth and stored by the user locally. In this case, two parameters are needed:
- Verifiable credential in .JSON format or plain text
- Mnemonic passphrase used to sign the credential

To integrate a decentralized registration and log-in option using a verifiable credential via a simple API, follow the steps below. 👇
Step-by-step integration
With Apillon, KILT-based decentralized user authentication is at your fingertips.
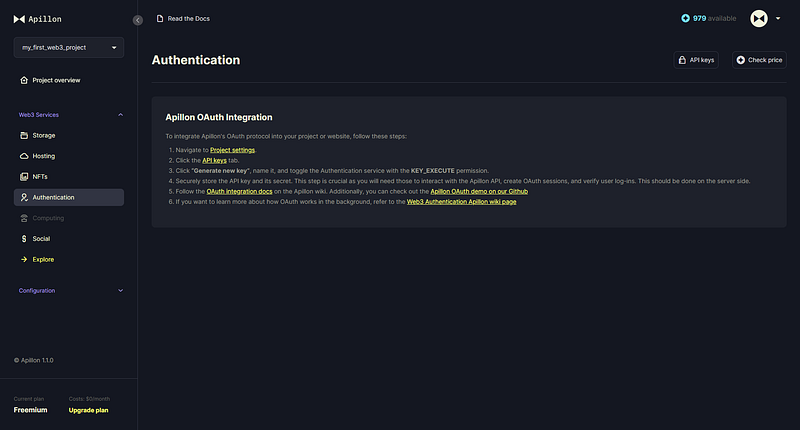
On your Apillon account dashboard, you can find step-by-step instructions under the Authentication service in the menu on the left.
Let’s begin.
To integrate the feature into your Web3 project or website, you need to connect via an API key.
Go to Project settings under your avatar image in the top right corner to generate one.

Under the API keys tab, click “Generate new key”.

In the pop-up on the right, enter the API key name to distinguish it from others and toggle the Authentication service. Be sure to check all permissions, including the Execute permissions option.
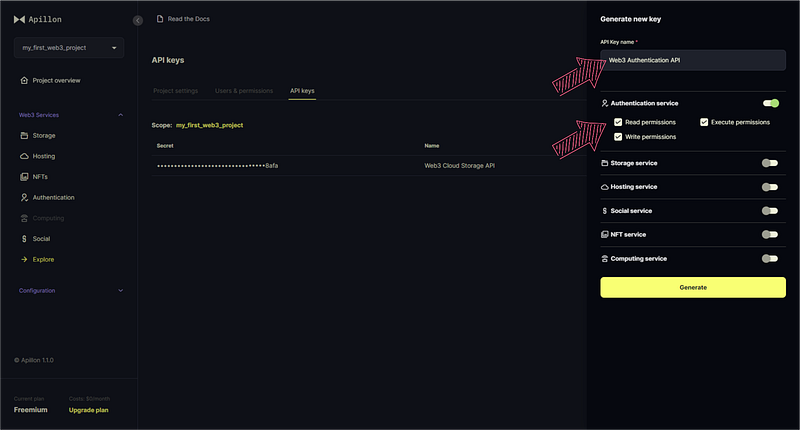
Click “Generate”. Once the API key is generated, a pop-up appears with its details, including the API key secret — you should store it safely since it will enable your website or project to interact with Apillon’s Authentication API, create OAuth sessions, and verify user log-ins.
Click “I’ve saved API key secret”, and you’re good to go.

Now, the fun part begins.
Go to Apillon Wiki’s OAuth Integration section and use the code snippets to integrate the decentralized authentication service into your website, project, or dapp.
Need more guidance? Check the complete demo for Node.JS on Apillon GitHub. 👇

Power to the users
With a decentralized authentication feature, you can offer your community a safer and more self-sovereign way of using and managing their online identities.
Log into the Apillon dashboard, connect via API, and upgrade your project to a Web3 level today.

⧓ About Apillon
The Apillon platform serves as a unified gateway to the Web3 services provided by linked Polkadot parachains. Following the multi-chain vision, Apillon powers the transition of developers to Web3, simplifying its adoption in the real economy, and expanding its versatility as the ecosystem grows. With Apillon, Web3 services are within reach for every developer, regardless of their background and experience with blockchain technology.
Website | Wiki | GitHub | Twitter | Discord | LinkedIn | Reddit